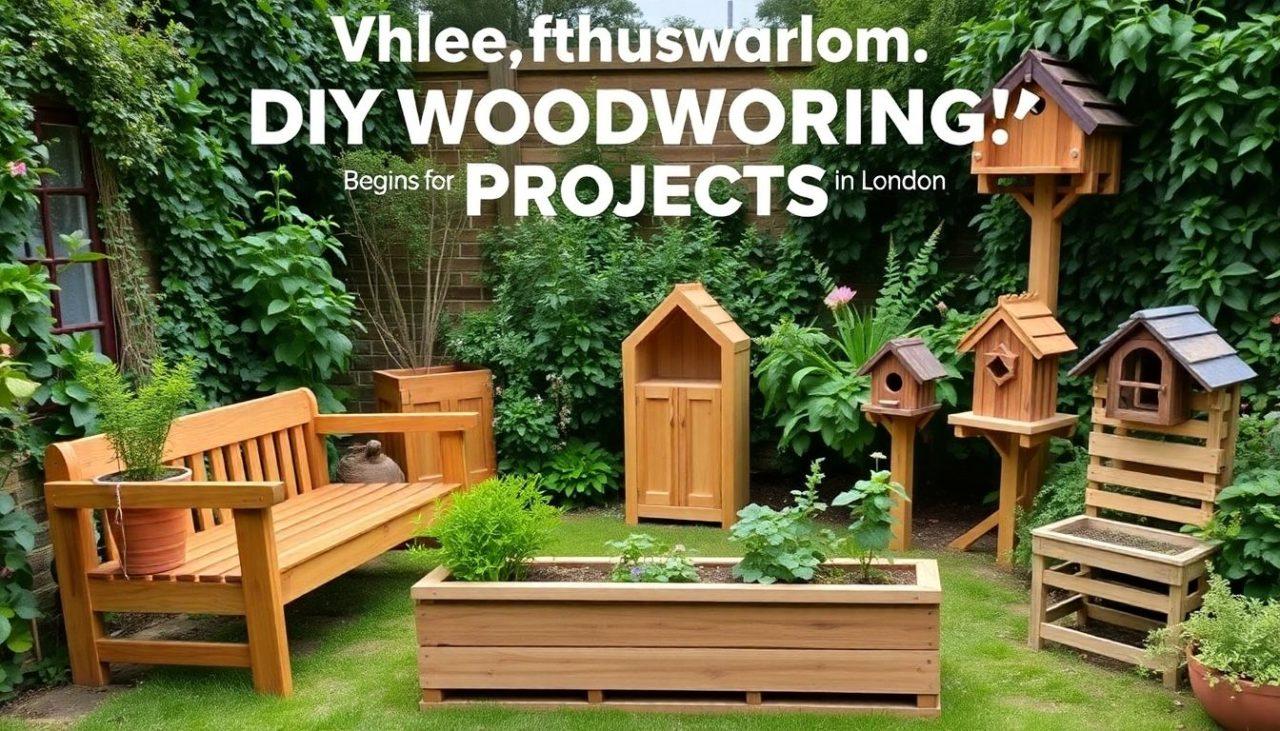
If you’re looking to enhance your outdoor space in London, beginner carpentry projects are a fantastic way to start. Not only do these projects allow you to create beautiful and functional items for your garden or patio, but they also provide a great opportunity to learn new skills. Whether you’re crafting a rustic bench or building a birdhouse, these projects are perfect for anyone eager to dive into woodworking. Here’s a list of key takeaways to help you get started on your outdoor carpentry journey.
Key Takeaways
- Beginner projects can be simple yet rewarding, making them perfect for first-timers.
- Using the right materials and tools will ensure your projects are successful and durable.
- Step-by-step guides can help you understand the construction process better.
- Personalise your designs to make your outdoor space unique and inviting.
- These projects not only beautify your garden but also provide a sense of accomplishment.
Crafting a Rustic Garden Bench
Creating a rustic garden bench is a fantastic way to add charm to your outdoor space. It’s a simple project that can be completed in a weekend! Here’s how to get started:
Selecting the Right Wood
- Cedar: Naturally resistant to rot and insects.
- Pine: Affordable and easy to work with, but may require treatment.
- Oak: Durable and strong, perfect for a long-lasting bench.
Basic Tools You’ll Need
- Saw: For cutting the wood to size.
- Drill: To make holes for screws.
- Screwdriver: For assembling the pieces.
- Sandpaper: To smooth out rough edges.
Step-by-Step Guide to Assembly
- Cut the wood: Measure and cut your wood pieces according to your design.
- Assemble the frame: Start by building the base and attach the legs.
- Add the seat: Secure the seat planks to the frame.
- Finish it off: Sand down any rough spots and apply a wood finish if desired.
Remember, taking your time and enjoying the process is key to a successful project!
Building a Simple Wooden Planter
Creating a wooden planter is a fantastic way to add some greenery to your outdoor space. It’s a fun project that even beginners can tackle! Here’s how to get started:
Materials and Tools Required
- Wood: Choose rot-resistant wood like cedar or redwood.
- Screws: Galvanised screws are best for outdoor use.
- Wood Glue: For extra strength.
- Tools:
- Saw (hand saw or power saw)
- Drill
- Screwdriver
- Measuring tape
- Sandpaper
Designing Your Planter
- Decide on the Size: A common size is 1m long, 0.5m wide, and 0.5m deep.
- Shape: Rectangular planters are easiest to build.
- Drainage: Make sure to include holes at the bottom for water drainage.
Tips for Assembly and Finishing
- Cut the Wood: Measure and cut your wood pieces according to your design.
- Assemble: Use wood glue and screws to attach the sides, base, and ends.
- Sand the Edges: Smooth out any rough edges to prevent splinters.
- Finish: You can paint or stain your planter to protect it from the elements.
Building a planter is not just about the end result; it’s about enjoying the process and getting your hands a bit dirty!
Creating a Wooden Birdhouse
Choosing the Right Wood
When it comes to building a birdhouse, selecting the right wood is crucial. Opt for untreated cedar or pine, as these woods are durable and safe for birds. Avoid pressure-treated wood, as it can be harmful to our feathered friends.
Essential Tools and Materials
Here’s a quick list of what you’ll need:
- Tools:
- Saw (hand saw or power saw)
- Drill with bits
- Screwdriver
- Sandpaper
- Materials:
- Wood (cedar or pine)
- Wood screws
- Non-toxic wood glue
- Paint or wood stain (optional)
Step-by-Step Building Instructions
- Cut the Wood: Start by cutting your wood into the necessary pieces. You’ll need a base, four walls, and a roof.
- Assemble the Walls: Use wood screws and glue to attach the walls to the base. Make sure to leave a small entrance hole for the birds.
- Attach the Roof: Secure the roof pieces on top, ensuring they overhang slightly to protect the entrance from rain.
- Sand and Finish: Smooth out any rough edges with sandpaper. If you want, you can paint or stain the birdhouse, but make sure to use non-toxic products.
- Mounting: Finally, find a suitable spot in your garden to hang or mount your birdhouse, ideally away from predators.
Building a birdhouse is not just a fun project; it’s a great way to support local wildlife and enjoy nature right in your backyard! Remember, this guide offers beginner-friendly carpentry projects, so don’t hesitate to give it a go!
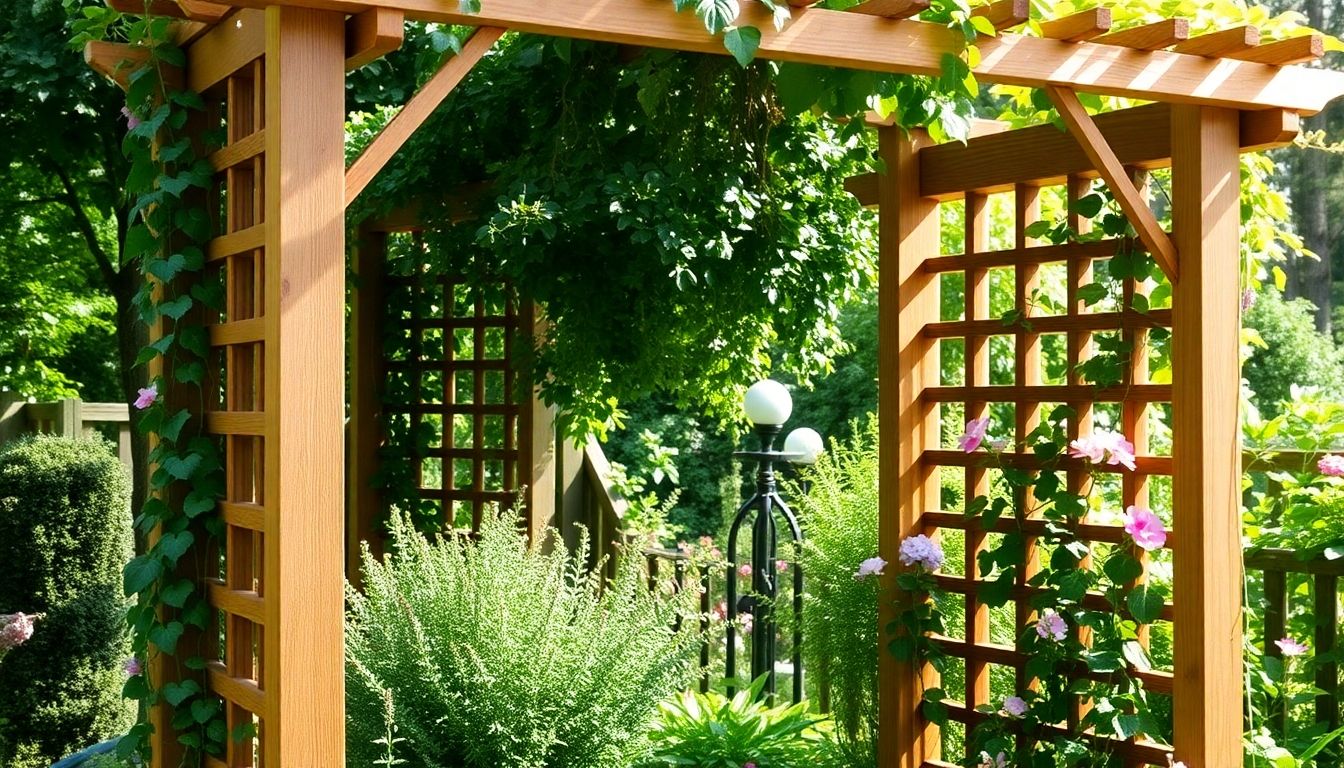
Constructing a Garden Trellis
Materials Needed
When you’re ready to build your garden trellis, you’ll need a few essential materials:
- Wood: Choose durable types like cedar or redwood.
- Nails or Screws: For securing the pieces together.
- Wood Glue: Optional, but it adds extra strength.
Design Ideas for Your Trellis
Here are some fun ideas to inspire your design:
- Arched Top: Adds a classic touch.
- Lattice Pattern: Great for climbing plants.
- Painted Finish: Brighten up your garden with colour.
Assembly Instructions
Follow these simple steps to put your trellis together:
- Cut the Wood: Measure and cut your wood to the desired size.
- Assemble the Frame: Use nails or screws to join the pieces.
- Attach the Lattice: Secure the lattice to the frame for support.
- Finish Up: Sand any rough edges and apply a weatherproof finish.
Building a trellis is a fantastic way to add some charm to your garden while providing support for your plants. It’s a rewarding project that enhances your outdoor space!
Making a Wooden Adirondack Chair

Wood Selection and Preparation
When it comes to making your own Adirondack chair, the first step is choosing the right wood. Here are some popular options:
- Cedar: Naturally resistant to rot and insects.
- Pine: Affordable and easy to work with, but may need treatment.
- Teak: Durable and weather-resistant, but pricier.
Make sure to prepare your wood by sanding it down to avoid splinters and ensure a smooth finish.
Tools and Materials List
Before you start, gather the following tools and materials:
| Tool/Material | Purpose |
|---|---|
| Circular saw | Cutting wood to size |
| Drill | Making holes for screws |
| Screws | Joining pieces together |
| Sandpaper | Smoothing surfaces |
| Wood finish | Protecting the wood |
Detailed Assembly Guide
Follow these steps to assemble your chair:
- Cut the wood: Measure and cut your pieces according to the design.
- Drill holes: Make holes for screws in the right places.
- Assemble the seat: Start by attaching the seat slats to the frame.
- Attach the backrest: Secure the backrest to the seat.
- Finish up: Sand any rough edges and apply your wood finish.
Building your own Adirondack chair is not just about the end product; it’s about enjoying the process and creating something special for your outdoor space. Get ready to relax in style!
Designing and Building a Wooden Pergola
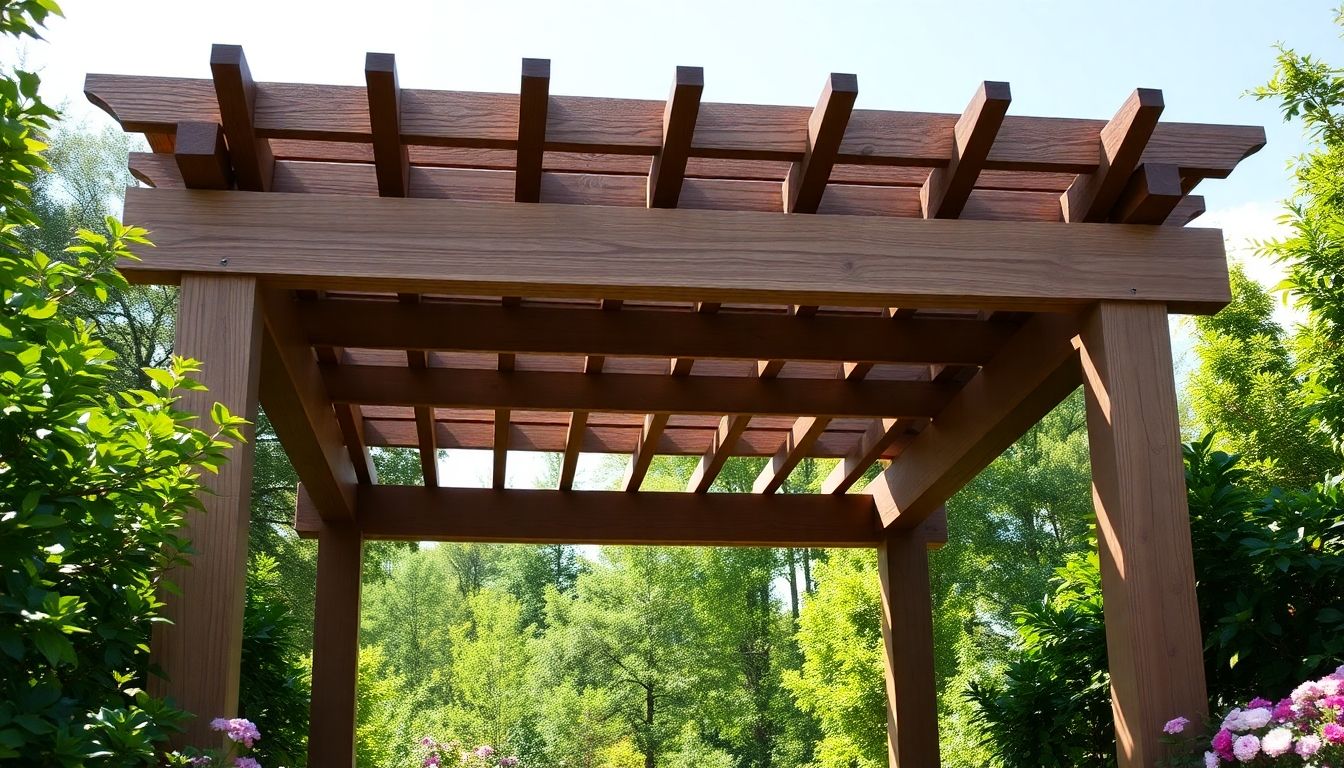
Creating a wooden pergola can really enhance your outdoor space. It’s a great way to add style and functionality to your garden! Here’s how to get started:
Planning Your Pergola
- Choose the Location: Find a spot that gets enough sunlight but also offers some shade.
- Decide on Size: Think about how big you want your pergola to be. A larger one can create a nice gathering space.
- Design Style: Consider the look you want. Do you prefer a classic or modern design?
Materials and Tools
| Material | Quantity | Purpose |
|---|---|---|
| Pressure-treated wood | Varies | Main structure |
| Screws | Varies | Assembly |
| Concrete | Varies | Securing posts in the ground |
| Wood stain/paint | Varies | Finishing touches |
Tools You’ll Need:
- Drill
- Saw
- Level
- Measuring tape
- Safety goggles
Construction Steps
- Prepare the Site: Clear the area where you’ll build the pergola.
- Set the Posts: Dig holes for the posts and secure them with concrete.
- Add Beams and Rafters: Attach the horizontal beams and then the rafters on top.
- Finish Up: Sand any rough edges and apply wood stain or paint for protection.
Building a pergola is not just about aesthetics; it can also provide a lovely shaded area for relaxation or entertaining guests.
With these steps, you’ll be well on your way to creating a beautiful wooden pergola that enhances your outdoor space!
Crafting a Wooden Picnic Table
Choosing the Right Timber
When it comes to building a picnic table, selecting the right wood is key. Here are some popular options:
- Pressure-treated pine: Affordable and durable, great for outdoor use.
- Cedar: Naturally resistant to rot and insects, but pricier.
- Redwood: Beautiful and long-lasting, but can be expensive.
Tools and Materials
Before you start, gather these tools and materials:
- Tools:
- Saw (hand saw or power saw)
- Drill
- Screwdriver
- Measuring tape
- Sandpaper
- Materials:
- Timber (your choice)
- Wood screws
- Wood glue (optional)
- Outdoor wood finish (for protection)
Step-by-Step Assembly
Follow these steps to create your picnic table:
- Cut the wood: Measure and cut your timber to the desired lengths for the tabletop, legs, and benches.
- Assemble the frame: Start by building the frame for the tabletop using screws and wood glue for extra strength.
- Attach the legs: Secure the legs to the frame, ensuring they are sturdy and level.
- Add the tabletop: Lay the planks for the tabletop across the frame and secure them in place.
- Finish it off: Sand down any rough edges and apply an outdoor finish to protect your table from the elements.
Building a picnic table is a fun project that can bring family and friends together for years to come. Enjoy your time outdoors!
With a bit of effort, you’ll have a lovely picnic table ready for summer barbecues and lazy afternoons in the garden.
Building a Simple Wooden Deck
Creating a wooden deck can be a fantastic way to enhance your outdoor space. It’s a great project for beginners and can really transform your garden or patio into a lovely area for relaxation and entertaining.
Planning and Design
- Choose the Location: Find a flat area in your garden that gets plenty of sunlight.
- Measure the Space: Use a tape measure to determine how big you want your deck to be.
- Sketch Your Design: Draw a simple plan of your deck layout, including any steps or railings.
Materials and Tools Needed
| Material/Tool | Quantity |
|---|---|
| Decking Boards | Varies |
| Joists | Varies |
| Screws | 1 box |
| Hammer | 1 |
| Drill | 1 |
| Saw | 1 |
| Level | 1 |
Construction Process
- Prepare the Ground: Clear the area of any grass or debris.
- Lay the Foundation: Use concrete blocks or posts to create a sturdy base.
- Attach the Joists: Secure the joists to the foundation, ensuring they are level.
- Lay the Decking Boards: Start from one end and work your way across, securing each board with screws.
Building a deck is not just about the materials; it’s about creating a space where you can enjoy the outdoors with family and friends. Take your time and enjoy the process!
Creating a Wooden Garden Bridge
Building a wooden garden bridge can be a fun and rewarding project that adds charm to your outdoor space. It’s a great way to connect different areas of your garden while showcasing your carpentry skills! Here’s how to get started:
Selecting Materials
- Wood Type: Choose durable wood like cedar or redwood, which resist rot and insects.
- Dimensions: Decide on the size of your bridge based on the space available and the width of the stream or path it will cross.
- Finish: Consider using a weather-resistant finish to protect your bridge from the elements.
Design Considerations
- Style: Think about the style of your garden. A rustic bridge might suit a wildflower garden, while a sleek design fits a modern landscape.
- Height: Ensure the bridge is high enough to allow water flow underneath if crossing a stream.
- Railings: Adding railings can enhance safety and aesthetics.
Step-by-Step Construction Guide
- Plan Your Design: Sketch your bridge layout, including dimensions and materials.
- Gather Tools: You’ll need a saw, drill, screws, and a level.
- Build the Frame: Start with the base, ensuring it’s sturdy and level.
- Add the Decking: Lay down the planks for the walking surface, securing them well.
- Install Railings: If you’ve chosen to add railings, now’s the time to put them in place.
- Finish Up: Sand any rough edges and apply your chosen finish.
Remember, safety first! Always wear protective gear when working with tools.
Creating a wooden garden bridge is not just about functionality; it’s also about adding a personal touch to your outdoor space. With a bit of planning and effort, you can create a beautiful feature that enhances your garden’s appeal. Happy building!
Making a Wooden Garden Swing
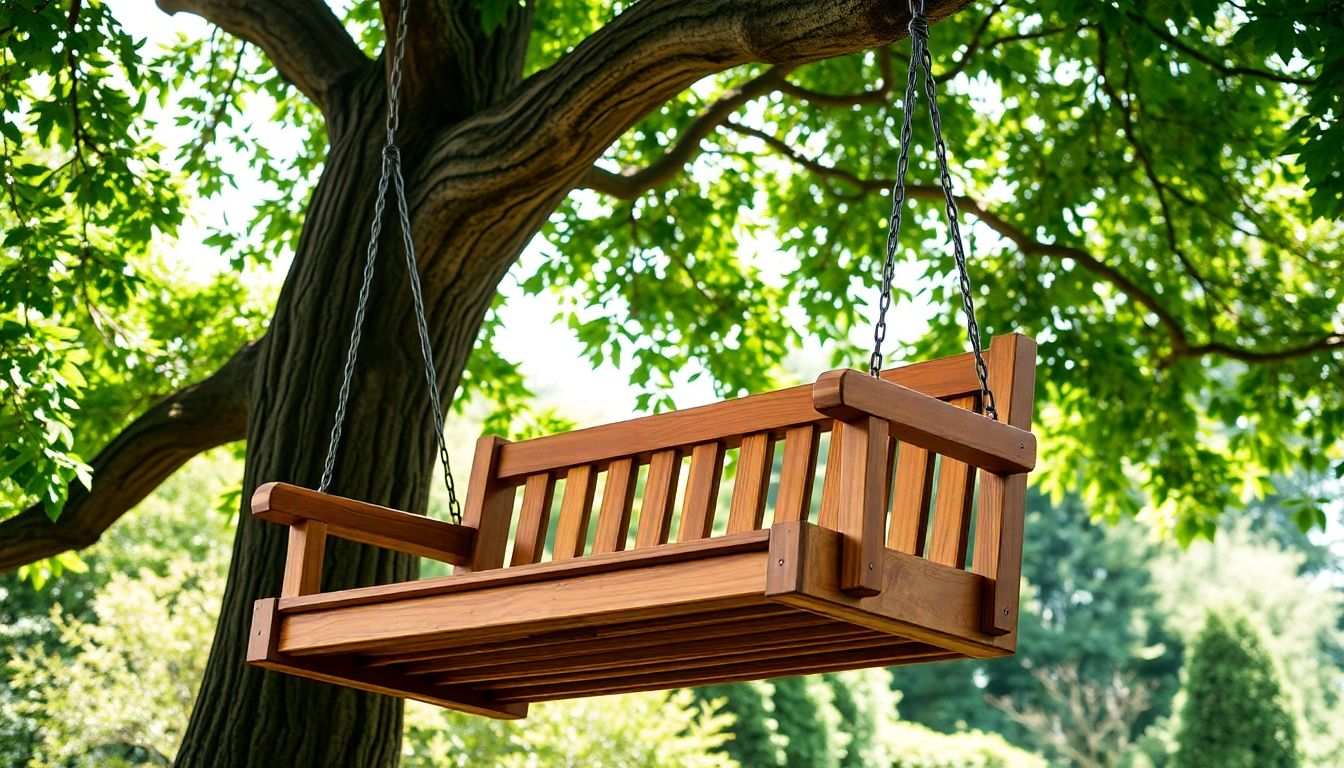
Choosing the Right Wood
When it comes to making a garden swing, selecting the right wood is crucial. Here are some popular options:
- Cedar: Naturally resistant to rot and insects.
- Redwood: Durable and has a beautiful finish.
- Pressure-treated Pine: Affordable and widely available.
Tools and Materials Required
Before you start, gather these tools and materials:
- Tools:
- Saw (hand saw or power saw)
- Drill
- Sandpaper
- Measuring tape
- Materials:
- Wooden planks (for the seat and frame)
- Heavy-duty rope or chain (for hanging)
- Wood screws
Assembly Instructions
Follow these steps to assemble your swing:
- Cut the wood to the desired lengths for the seat and frame.
- Sand the edges to avoid splinters.
- Assemble the frame using screws, ensuring it’s sturdy.
- Attach the seat securely to the frame.
- Hang the swing using the rope or chain, making sure it’s at a safe height.
Building a wooden garden swing is not just a fun project; it can also become a lovely spot for relaxation in your garden.
Constructing a Wooden Sandbox
Creating a wooden sandbox is a fantastic way to give your kids a fun outdoor space to play in. It’s simple to build and can be customised to fit your garden! Here’s how to get started:
Materials and Tools List
- Wood: Choose untreated timber like pine or cedar for durability.
- Screws: Use weather-resistant screws to hold everything together.
- Sand: Get clean play sand from a local supplier.
- Tools: You’ll need a saw, drill, measuring tape, and a level.
Designing Your Sandbox
- Size: Decide how big you want your sandbox to be. A common size is 1.5m x 1.5m.
- Shape: Rectangular or square shapes are easiest, but you can get creative!
- Location: Pick a spot that gets some sun but is also shaded during the hottest part of the day.
Building Instructions
- Step 1: Cut your wood to size. You’ll need four pieces for the sides and a base.
- Step 2: Assemble the frame using screws. Make sure it’s square by measuring diagonally.
- Step 3: Attach the base to the frame. This will keep the sand from spilling out.
- Step 4: Fill the sandbox with sand, leaving a little space at the top.
- Step 5: Optional: Add a cover to keep the sand clean when not in use.
Remember, a sandbox can be a great place for kids to develop their creativity and motor skills. Keep it safe and fun!
Building a Wooden Outdoor Storage Box
Selecting the Right Wood
When it comes to building your outdoor storage box, choosing the right wood is key. You want something that can withstand the elements. Here are some great options:
- Cedar: Naturally resistant to rot and insects.
- Redwood: Durable and has a beautiful finish.
- Pressure-treated pine: Affordable and sturdy, but make sure it’s treated for outdoor use.
Tools and Materials
Before you start, gather your tools and materials. Here’s a quick list:
- Tools:
- Saw (hand saw or power saw)
- Drill
- Screwdriver
- Sandpaper
- Materials:
- Wood planks (your choice from above)
- Wood screws
- Wood glue
- Outdoor wood finish or sealant
Step-by-Step Assembly Guide
Now, let’s get to the fun part! Here’s how to put it all together:
- Cut the wood to your desired dimensions. A common size is 1.2m x 0.6m x 0.6m.
- Assemble the base: Start with the bottom and attach the sides using screws and wood glue.
- Add the lid: Make sure it fits snugly and can be opened easily.
- Sand the edges to avoid splinters.
- Finish with a sealant to protect it from rain and sun.
Building your own storage box is not just practical; it’s a fun way to get into woodworking for beginners. Plus, you’ll have a great spot to store your garden tools!
If you’re looking to create a sturdy wooden outdoor storage box, now is the perfect time to get started! Visit our website for expert tips and guidance on building your own. Don’t miss out on the chance to enhance your outdoor space with this practical project!
Wrapping It Up
So there you have it! If you’re looking to spruce up your outdoor space in London, these beginner carpentry projects are a fantastic way to get started. Whether you fancy building a lovely pagoda or a comfy Adirondack chair, there’s something for everyone. Not only will you create something special for your garden, but you’ll also pick up some handy skills along the way. So grab your tools, get stuck in, and enjoy the process. Happy woodworking!
Frequently Asked Questions
What types of wood are best for outdoor projects?
The best woods for outdoor projects include cedar, redwood, and pressure-treated pine because they resist weather and insects.
Do I need special tools for carpentry projects?
Basic tools like a saw, hammer, and drill are usually enough to start. More advanced projects may need additional tools.
How long do these projects typically take?
Most beginner projects can be completed in a weekend, depending on your skill level and the complexity of the design.
Where can I find plans for these projects?
You can find plans in books, online tutorials, or woodworking magazines that offer step-by-step guides.
Is carpentry safe for beginners?
Yes, carpentry is safe for beginners as long as you follow safety guidelines and use tools correctly.
Can I personalise my projects?
Absolutely! You can customise your projects with different designs, sizes, and finishes to suit your taste.
What should I do if I make a mistake?
Mistakes are part of learning. You can often fix them by adjusting your design or using wood filler for small errors.
Are there classes available for learning carpentry?
Yes, many community centres and workshops offer classes for beginners to learn the basics of carpentry.